Cechy
- Model:
700
- Typ broni:
Remington
- Waga dostawy: 0,023kg
- Wysokość wysyłki: 13mm
- Szerokość wysyłki: 84mm
- Długość wysyłki: 180mm
- UPC: 050806109599
Szczegóły pozycji
Made in USA


700
Remington
Nr produktu: 080000507
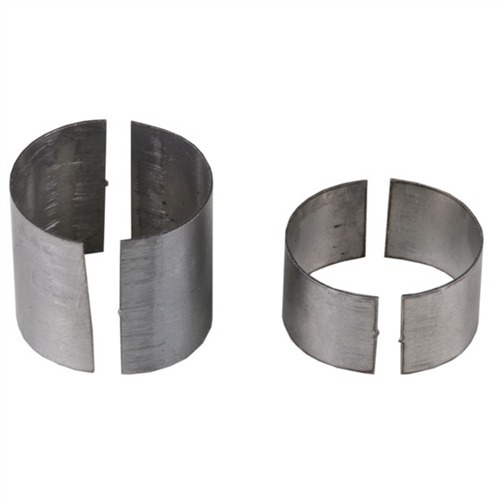
050806109599 Precyzyjnie uformowane podkładki ze stali węglowej wypełniają szczelinę i centrują korpus zamka po wyrównaniu odbiornika za pomocą wiertła Bolt-Way o średnicy .715". Oszczędza czas i wysiłek, eliminując potrzebę wytwarzania podkładek od podstaw. Aby zainstalować, należy wykonać podcięcie w korpusie zamka, aby przyjąć podkładki, a następnie przylutować lub przylepić je na miejscu za pomocą dołączonego środka utrzymującego. Przednie i tylne podkładki w dwóch częściach są produkowane z precyzyjnymi tolerancjami i wstępnie konturowane, aby zapewnić idealne dopasowanie do każdego korpusu zamka o średnicy .700". Po zainstalowaniu, obrób podkładki do O.D. .7135"-.7145" w celu zapewnienia odpowiedniego luzu dla ciasnego dopasowania zamka i zapewnienia niezawodnego cyklu.Czas dostawy ok. 14-21 dni.
Podkładki z węglowej stali, precyzyjnie formowane, wypełniają szczelinę i centrują korpus zamka po wytrawieniu odbiornika za pomocą wiertła Bolt-Way o średnicy .715\". Oszczędzają czas i wysiłek, eliminując potrzebę wytwarzania podkładek od podstaw.
Aby zainstalować, należy wykonać podcięcie korpusu zamka, aby zaakceptować podkładki, a następnie przylutować je lub przymocować za pomocą dołączonego środka utrzymującego.
W zestawie znajdują się przednie i tylne podkładki, środek utrzymujący oraz pełne instrukcje.
Po instalacji, należy przetoczyć podkładki do średnicy zewnętrznej .7135\"-.7145\" O.D., aby zapewnić odpowiedni luz dla ciasnego dopasowania zamka i zapewnić niezawodne cykle.
700
Remington
It will do the trick 04-11-2009
This is a good product, but needs better instructions for installation. The loctite adhesive that comes with the product needs further explanation. Loctite recommends that it be applied to both surfaces. I find that the adhesive holds better when left to set for 72 hours. They also recommend to rough up both surfaces for better adhesion. I used 600 grit on the inside of the shims and bead blasted the area of the bolt where the shims will be applied, tape off the rest of it. If you will be using the shims to build up the bolt for a sloppy raceway, calculate your finished diameter and subtract .020. Under cut the bolt to this diameter. The adhesive does take up a few thousands by itself. The rubber bands work fine to hold them in place. Make marks on the bolt before installing shims. Set shims on bolt about 30 to 40 degrees away the mark. Then rotate them as you apply them to the bolt to line up with your mark. Be generous with the adhesive. The excess that oozes out will not dry and can be wiped off with a shop towel. The setting process for the adhesive is caused by a lack of oxygen under the sleeves.
Do not clamp the shims to the bolt, only use rubber bands. This will allow enough adhesive to remain under the shims for adhesion.
When turning in the lathe - take small cuts like .001 or .oo2. This seems tedious but you are dealing with an interrupted cut. If you take too much, you can peel them right off the bolt.
If you follow all the rules there will sufficient material left on the bolt and they will do a great job.
One note extra, during the manufacturing of the shims they usually end up with a raised corner. This can be corrected by laying the shim over a round surface and gently tapping the corner with a light ball peen hammer. Also note that there is a little protrusion on one edge of each shim in a pair. Put those two edges together, I believe it is where they cut the shim in half and will keep them mated the way they were before the cut.
Napotkaliśmy błąd podczas wczytywania tej zawartości. Odśwież stronę, aby kontynuować. Jeśli problem będzie się powtarzał, skontaktuj się z naszym działem obsługi klienta.


w Brownells Europe, Twoim miejscu docelowym dla wszystkiego, co związane z bronią. Nasze korzenie tkwią w prawdziwej pasji do broni palnej, dlatego oferujemy niezrównany wybór części do broni, akcesoriów do broni palnej, narzędzi rusznikarskich, celowników i kolimatorów oraz wiedzy eksperckiej.
Niezależnie od tego, czy chcesz konserwować, naprawiać, czy ulepszać swoją broń, mamy to, czego potrzebujesz!
Dla Strzelców, Od Strzelców
Dzielimy Twoją pasję i dokładnie wiemy, czego szukasz, ponieważ jesteśmy częścią tej społeczności.
Ogromny Wybór
Od niezbędnych elementów po unikatowe, znajdziesz wszystko pod jednym dachem.
Nasza Mieszanka Tradycji i Innowacji
Kupuj z wygodą nowoczesnej technologii, wspartą dziedzictwem doświadczenia.
Przeglądaj naszą kolekcję i odkryj dlaczego jesteśmy zaufaną marką w sportach strzeleckich i myślistwie.
Ta strona jest obsługiwana przez Brownells Polska
Brownells jest zarejestrowanym znakiem towarowym firmy Brownells Incorporated i jest używany na podstawie licencji przez Brownells Polska oraz niezależnego dystrybutora w Polska od Brownells Incorporated.